$35 for the 3 sessions together
I know some of you enjoy painting landscapes so I thought we could explore a few as the seasons change from summer to autumn. This is a 3-session class so we can take the time to paint our summer field of yellow flowers, our fence with an autumn vine, and then move into a more detailed autumn hawthorn leaf. I will paint using watercolor paints and watercolor pencils, so you are welcome to choose your media. The addition of graphite pencils are a terrific option here, too, so I’ll spend a little time showing that option.
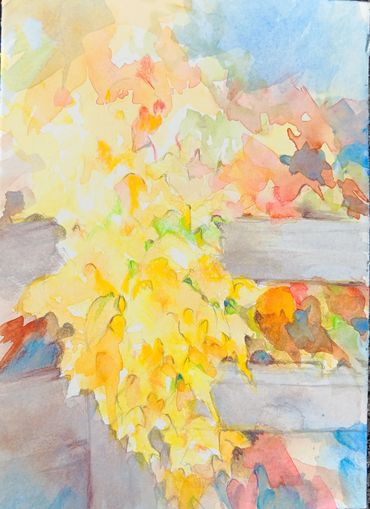
SUMMER YELLOW FIELD (See swatch below)
WATERCOLOR PAINTS: Aureolin, New Gamboge, Quinacridone Red, Quinacridone Pink, Burnt Sienna, Sap, Phthalo Green, Cobalt and/or Winsor Blue Red Shade
WATERCOLOR PENCILS: Light Yellow Glaze, Cadmium Yellow, Cadmium Orange, Light Green, Permanent Green Olive, Dark Phthalo Green, Light Cobalt Turquoise, Helio-blue Reddish
INK OPTION: a black micron pen, with the possible addition of FW (liquid) Artist Acrylic White Ink
AUTUMN VINE
WATERCOLOR PAINTS: Aureolin, New Gamboge, Scarlet Lake or Scarlet Pyrrol, Quinacridone Red, Light Red, Burnt Sienna, Sepia, Sap, Cobalt
WATERCOLOR PENCILS: Light Yellow Glaze, Cadmium Yellow, Cadmium Orange, Dark Cadmium Orange, Scarlet, Light Green, Earth Green Yellowish, Cold Gray III, Inktense Dark Chocolate, Helio-blue Reddish, Light Cobalt Turquoise, Raw Umber, Burnt Ochre, Fuchsia
PENCIL OPTION: 2H or 4H pencil, with the possible addition of HB or B or H
PROCEDURE when using MASK (either the card view or long view)
--Sketch loosely to locate foreground flowers, trees, and background flower groups.
--Mask foreground flowers, some background flower groups, and stems.
--Add watery washes, with blue on the top into the center and yellow on the bottom into the center.* After this dries, add additional green in the tree area.
--Dry. Repeat washes for more depth as many times as desired.
--Remove mask on dry surface.
--Ink outline of some of the flowers with a black or colored micron pen.
--Outline the top and bottom of the tree line. Add additional ink for tree texture or detail if you want. –In the Field area add depth, detail, and interest with paint, micron ink, and/or white liquid ink.
--Color the flowers using yellow, orange/red and possibly other colors of your choice.
--I colored some of the centers using green, blue, brown, or dark orange.
*This can either be with wet watercolor paint or glazes of watercolor pencil.
PROCEDURE without MASK
--Sketch more carefully than the masked demos.
--Begin by coloring the background behind the foreground flowers. There is blue at the top into the center area and yellow on the bottom into the center area.*
--Add additional layers of blue, yellow, and add green in the tree area until your color and value look good to you.
--Color the flowers using yellow, orange/red and possibly other colors of your choice.
--I colored some of the centers using green, blue, brown, or dark orange.
*The color can be using watercolor pencils, watercolor paints used with a dry, small brush, or permanent colored pencil.
In class there were questions about how I was doing the background sections “behind” the fence where I wanted to suggest leaves. Because this is a difficult concept, I wanted to go over it a bit here. In these areas I first just used yellows and reds which I applied wet and let the colors mix in the area. Once these dried, I used negative drawing (painting or drawing the area behind my leaf “shapes”) to outline and suggest leaf shapes. These areas “behind” the shapes are painted or drawn with darker value, lower intensity color, or color complements. I took a photo of the section I tried to do this in class today and I’ve included it in this email. This is the beginning of the negative painting. I can continue doing this as much as I want until I am happy with the results. I hope this helps show my technique, since it’s kind of confusing sometimes. I hope you can look at my step-by-step photos of the entire demonstration and see these areas develop.
VINE
Stage#1 watercolor paint—Aureolin, leaving spots white of paper, adding touches of New Gamboge
Or watercolor pencil Light Yellow Glaze, Cadmium Yellow
Stage#2 watercolor paint—Scarlet Lake/Quinacridone Red, Sap
Or watercolor pencil—Scarlet/Pale Geranium Lake/Fuchsia, Light Green
Stage#3 watercolor paint—peak-through Cobalt+Light Red
Or Watercolor pencil -- Cold Gray III + touch of Helio-blue
Red detail and definition—2H with supplemental color
FENCE
Stage#1 watercolor paint--Cobalt+Light Red
Or watercolor pencil—Cold Gray III, Helioblue Red
Stage#2 2H adding Cobalt or possibly Quinacridone Red
Or watercolor -- Helioblue Red or possibly Fuchsia
BACKGROUND
Upper Right watercolor paint—Cobalt Or watercolor pencil—Helioblue Red, Light Cobalt Turquoise
Middle Right Stage#1 watercolor paint—Aureolin, leaving spots of white paper, adding touches New Gamboge, Scarlet Lake/Quinacridone Red
Or watercolor pencil—Light Yellow Glaze, Cadmium Yellow, Scarlet
Stage#2 watercolor paint—Burnt Sienna, Sap, Cobalt or watercolor pencil—Burnt Ochre, Raw Umber, Helioblue Red, Fuchsia
Lower Right watercolor paint—Cobalt, touches Quinacridone Red, Burnt Sienna, Sepia
Watercolor pencil—Helioblue Red, Fuchsia, Dark Chocolate, Burnt Ochre
Upper Left watercolor paint—Cobalt, Aureolin, Sap, Quinacridone
Watercolor pencil—Helioblue Red, Scarlet, Fuchsia, Light Green
Middle and Lower Left watercolor paint—Cobalt, Quinacridone Red, Light Red, Burnt Sienna, touch Sepia
Or watercolor pencil -- Helioblue Red, Fuchsia, Cold Gray III, touches Dark Chocolate
Stage#1 of watercolor pencil
We use cookies to analyze website traffic and optimize your website experience. By accepting our use of cookies, your data will be aggregated with all other user data.